
Within the WordPress editor are a series of buttons for editing, such as Bold, Italic, Text positioning and several others. The second row is known as the "Kitchen Sink" and, while this second row of buttons is usually hidden by default in WordPress, the Seja Framework default is to have them open.
As well as the standard WordPress buttons there are a four additional buttons and a number of custom styles that are available to you.
The first two buttons are self-explanatory.
1. YouTube
will embed a YouTube video into your post
2. Facebook
button adds a like button. The next two are less obvious
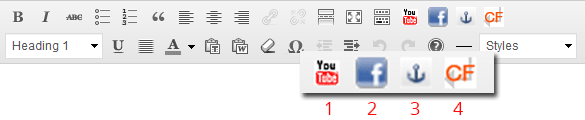
3. Anchor Text
Sometimes you need to link to content that is part of the way down the page. To do this we create an anchor for the hyperlink (Want to see this working, click here).
The anchor button creates a div with a name that you specify. You can choose to wrap your content within this div or have it as an empty container but, once you have a named div you can then create a hyperlink to that div.
You should be careful with naming as there may already be a div with the name you have chosen. A good way to avoid this is to add your site name into the div or alternatively, an SEO term. For example you might want to call the div yoursitename-about-this. You should not leave spaces between words but use a hyphen to break them up. Some examples of div names you should NOT use are structural, such as header, footer, content, sidebar.
Once you have created your div it's a simple matter to link content to it. Just as you would link normal content clicking on the Link Chain icon you would do the same and preface the div name with a hash, ie #yoursitename-about-this. You can also link to anchor content in different pages by including the page URL prior to the hash ie http://www.yoursitename.com/pagename/#yoursitename-about-this.
Anchor Texts are especially useful in FAQ style pages.
4 Clearfloat
Clearfloat is a custom workaround to deal with floating elements. If you're working with multi-column divs (such as the ones in the style drop-downs) or left/right aligned images, you are dealing with floats and these can have an unexpected result in the way your content is rendered by WordPress
A great example of this would be a left aligned image with a small amount of text to the right. This is fine until you need to add a second image, also left aligned and discover that you've created a stair effect and there are two ways to prevent this. The easiest way would be to use the Horizontal Rule to break the image. Doing this renders correctly in both the Editor back-end and on the site itself but does leave a great big line in your content. Clearfloat does the same thing, but without adding the line to the page.
There is one drawback with the Clear float method and that is, because it's shortcode, it is not picked up in the Editor itself so will look confusing.
Below is an example of the cascade effect of floating images![]()
